Thursday, March 31, 2011

Nothing but white flowers, please

I spent all last week making lots and lots and lots of flowers to fill an order. They wanted all white. I didn't have time to take any pictures of the process but will be making more of the same so I will next time.

It is hard for me to leave all these flowers in just white. When I looked at them scattered around the drying area I kept saying to myself.. just a little color. That is all they need. But, I left them alone. Or did I? I did add some color to the moth orchids since the throat just couldn't stay all white. And the Peonies have yellow stamens so there is the color.


White gumpaste flowers

When I laid all the white flowers out together to take the pictures I decided all white flowers do look really nice. I just looked at them for a while and realized they look very beautiful all white and they will be going on the cake and make the person very happy. They will be adding silver touches here and there to them so I will have to wait and see the pictures.

All the white gumpaste flowers together

Sunday, March 20, 2011

The 4 and 5 petel cutter

I made Dendrobium orchids and filler flowers all in white. I can get a bit carried away with making filler flowers making them as detailed and exciting as the main flower. This time I decided to go with the basic 4 and 5 petal cut out flower. But, I didn't want them all the same round shape, so after I sofented the edges I pinched the tips of a few, curved some and ended up with a few different styles using just the one cutter.

This would be a good flower to make for those who never worked with gumpaste but would like to learn or give it a try. It is cut, softened, shaped and dried.. which is the basis for most if not all the flowers I make.


gumpaste cutters and tools

I roll out the gumpaste  on the pad which leaves a length of paste on the back to add the wire in and then cut it out.


rolled out gumpaste

cutting out the flower

You can see the extra paste through the cutter formed in the hole in the pad. You can do this by hand as well.
Softening the edges gives them a more realistic look. It also smooths any messy edges

Softening the gumpaste petals

After the wire is added to the gumpaste flower and the edges are softened and shaped slightly it is laid in the former till it dries to keep its shape.


gumpaste filler flower drying

Using the same round 4 petal cutter I was able to get different shapes and looks.


Filler flowers using same cutter


Friday, March 11, 2011

The making of the Gardenia


When I asked for suggestions of flowers to make a friend said a Gardenia. So of course I had to look up on line what the actual flower looks like compared to the many gumpaste ones I have seen. Then I went to the store to see them first hand. I found there are more than one variety and chose to make the Gardenia Jasminoides variety. It is very full with nice texture on the petals and also has many different shapes to them. As I make a new gumpaste flower I also learn a little about the flower as well.

The Gardenia Jasminoides is a tropical plant, very fragrant, and a favorite for gardens. It is also known as the Gardenia Augusta. Here is the sample I found that I just loved and wanted to make.


A photo of a real Gardenia

 Since I am making this version of  the Gardenia in gumpaste for the first time I had to find the right cutters in my collection to cut out the petals.. some trial and error to get what I wanted but finally I found a match that I liked.


Here are all the tools to make the Gardenia.


I roll out the gumpaste fairly thin and cut the petal out


 I  soften the edges 


I start to shape the gumpaste to give the petals a more natural flowing look. 


Then  I begin to assemble the flower.


The finished flowers

Shaile's Edible Art. www.shailesedibleart.blogspot.com

I will post an arragement with the Gardenia's as soon as I complete the other flowers that go with them

Thursday, March 10, 2011

The finished looked

It was very fun to make these little lilacs and I do plan to make more for future arrangements. They were suggested by a friend.. I also did re-wire the four bunches I had previously made into these two tighter bunches.  And yes, I feel they look much nicer this way just like they are in real life..


Lilacs take center stage

At first I couldn't decide how to include them for a cake topper. I laid out all my sugar flowers I thought would look nice together, then began creating different arrangements and changing sugar flowers and finally decided this is the one I like the most.

I wanted the lilacs to stand out from the rest and with the bright color and being placed higher than the other sugar flowers I think it came out very nicely. 

Lovely Lavander cake with gumpaste flowers

Sunday, March 6, 2011

Wonderful Moth Orchids

Orchids are my favorite flower to make in sugar...

I never get bored making them and I like the challenge of the intricate details that is added to make them look more realistic.

As you can see I had made quite a lot of these moth orchids for this lovely arrangement. Everything is made of sugar except the container and the grassy filling. 


Gumpaste moth orchid

Friday, March 4, 2011

Lovely Little Lilacs

I really hoped I had made enough of these little flowers to make a huge arrangement since I was making them for hours... when all was said and done it seems I made 4 small bunches which I could have assembled in a tighter fashion. But, being anxious to finish them I opted to leave them as they are. I will make more of them and rewire them into tighter fuller bunches and take more pictures to compare.


Just the color I wanted

I last posted the lilacs made, but patiently waiting for the color to be added, the leaves to be made and assembled. Here is stage 2 adding the dusting powder which I normally like to add in layers. I do mix colors but also layer the colors to give them a more natural look. The lilac leaves are a rather bright green in one shade. I still mixed the greens I have to get a green I liked.


Adding the different colors


Color added and ready to assemble


pale green gumpaste to start then add shades of green

All colored added now assembly time
The last stage is assembly which of course everyone is always anxious to get to. At least the first time making a flower I can say I get anxious. I just can't wait to see if they come out how I expected them to or if I need or really want to remake them.  But of course the more you make a flower the better you get and can fine tune any part of them you aren't happy with or change the way you make them.

Lovely little lilacs

I think these will  make great filler flowers and are very cute and fun to make.. I will make some more in a pale shade of pink and put them with the next larger flower I am going to make.. so, come back to see what I create next.  I will also post more pictures of a fuller bunch of lilacs.

Tuesday, March 1, 2011

Before they are transformed

When I start to make sugar flowers I get all excited to see the end result and visualize in my head what I want them to look like. I know beside making the flower itself I will need to add the extra details and colors.

When I first started to make sugar flowers and saw them at this stage, which is what I call the first stage I thought they wouldn't look like a real flower when they are done. There they sat drying and I just couldn't wait for stage 2...


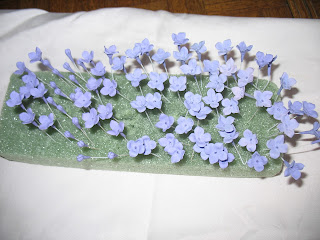
gumpaste Lilacs drying

So, I thought I would post these lilacs at stage 1 in the Styrofoam drying and waiting for stage 2.. my favorite part to add the color and start to bring them to life.  This is a close up...
gumpaste lilacs
Adding the color requires mixing and matching dusting powders... deciding what part of the flower I want to add it to and how many different shades I want.. I can get caught up in it since it is sometimes like creating your own garden.